How to Modify Startup Programs in Windows Xp
Z7_3054ICK0KGTE30AQO5O3KA30N0
hp-concentra-wrapper-portlet
![]() Actions
Actions
HP Notebook PCs - Computer Does Not Start (Windows 7, Vista, XP)
This document is for HP Notebook PCs with Windows 7, Vista, and XP.
This document lists the symptoms you see if the computer does not start, provides an overview of the complete troubleshooting process, and links to other documents with step-by-step details to restore the computer to proper operation. If your computer does not startup or boot into Windows, use this document to troubleshoot and correct the problem.
Perform a hard reset
If the computer suddenly fails to startup properly, perform a hard reset as the first action. Performing the hard reset might correct many problems. If the computer still does not start properly, select your symptom from the list below to guide you to the recommended corrective actions.
-
Disconnect all peripheral devices and remove all USB devices and SD media cards.
-
Disconnect the AC power adapter, remove the battery, and then press and hold the power button for at least 15 seconds to drain all residual power and restore default startup settings.
-
Reconnect the AC power adapter (but do not insert the battery), press the Power button, look for glowing lights near the caps lock and num lock keys, and listen for sounds of a fan or other moving parts turning.
If the computer starts normally after performing a hard reset, you are done troubleshooting. Otherwise, select the symptom below that best describes your issue and perform the troubleshooting steps provided.
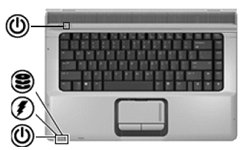
Symptom: LED lights do not glow, display is black, computer does not start
If no power is available to the computer, lights on the computer do not emit light, there is no fan noise, and the computer does not start. There are several things you can do to verify that power is available to the computer.
| Symptom | Possible Cause |
| When you press the power button: notebook does not react, display is black, LED lights do not glow, and there are no sounds. | Failed AC adapter or power cord, a discharged or damaged battery, a bad connection to the notebook, or a failed notebook system board component. |
Common actions to resolve no power issues
If the computer does not start, the LED lights do not glow, and the display is black, you can perform one or more of the following actions to resolve the issue.
-
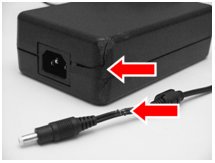
Verify the computer is receiving power from the AC adapter.
Verify that the AC adapter is not damaged and is connected correctly to a working wall outlet plug. Verify AC power is connected to the system board by examining the AC adapter, wiring, and pin connection for damage. The keyboard LEDs glow when AC power is connected to the system board.
Damaged components, like the AC adapter or the pin in the power connector, require an HP-certified repair.
-
Use a different AC power adapter.
If you have access to a different AC adapter or power pack that is designed for the computer, connect it and try to start the computer. If you own or have access to more than one notebook, verify that you are using the adapter which belongs to this computer.
caution:
Using a power adapter that does not meet the power requirements or has the wrong type of connector might damage the computer. On newer computers, connecting the wrong adapter might cause the power LED lights to blink but not power the computer.
-
Remove the battery and boot on AC power only.
A discharged or defective battery might prevent the AC adapter from supplying enough power to start the computer. To verify that power from the AC adapter is available to the computer, remove the battery, connect AC power adapter, and press the power button. If available, try using a different AC adapter that is rated for the computer, and repeat this test.
-
If the LEDS do not glow and the fan or hard drive do not spin, the AC adapter might need to be replaced.
-
If the LEDs glow and the computer boots, the battery might need to be replaced.
-
-
Remove the AC adapter and startup on battery power only.
A defective AC adapter does not charge the battery and prevents the computer from starting up on battery power only. To verify that battery power is available for the computer, connect the AC power adapter, allow the battery to charge for 30 minutes or more, disconnect the power adapter and press the Power button. If available, try using a fully charged battery of the same type from another computer, and repeat this test.
-
If the LEDS do not glow and the fan or hard drive do not spin, the battery might need to be replaced.
-
If tests of both the battery and the AC adapter fail, there might be a problem with the system board requiring service by HP.
-
If the LEDs glow and the computer starts, the AC adapter might need to be replaced.
-
Symptom: LEDs blink or computer beeps but does not start
| Symptom | Possible Cause |
| When you press the power button, some of the LED lights on the keyboard blink or a beep tone is made to help identify specific hardware component errors. | Beep tones or blinking LEDs on startup usually indicate a problem with the basic functionality of a critical component, and you might need technical assistance to resolve the error. The most commonly used LEDs are those located near the Caps Lock and Num Lock keys. The number of blinks or beep tones in a series is used by a technician to help diagnose a problem with specific hardware components. The number of blinks or beep tones and their meaning is different for different computers. |
| When a new computer is used for first time, the white LED light for the AC power connector blinks. | Battery is still in "Shipping Mode." The light continues to blink even when AC power is connected. To resolve this, turn off notebook, connect AC power and allow the battery to charge for at least 30 minutes, then start computer. |

Recognize Beep Tone Codes
On older computer models, the startup diagnostics use a series of tones (beeps) to identify errors. If you hear beep tones (usually 1 - 6 tones), contact HP to report the number and duration of the tones, and receive technical assistance.
Recognize Blink Codes
On HP Pavilion and Compaq Presario computers built in 2009 or later, the startup diagnostics use blinking LEDS to identify errors. If you see the LEDs near the caps lock or num lock keys blinking (usually 1 - 8 blinks in a series), contact HP for assistance.
Blink codes and beep tone codes have a similar purpose but the number of blinks or beeps does not indicate the same error conditions. The codes are specific to individual models, and you need to know your exact model number.
Common actions to resolve LED blink or beep tone error code
When there is a startup problem and you see LED lights on the keyboard blink a few times, or hear beep tones, do the following actions:
-
Press the power button to turn on the computer and look for blinking LED lights on the keyboard, or listen for beep tones.
-
Count the number of blinks or beeps in the sequence.
After the sequence of blinks or beeps, there is a pause for a few seconds, and the sequence of blinks or beeps is repeated (usually 3 times). After the blink sequence is repeated, the LEDs do not glow until the power button is pressed again.
-
Contact HP for technical assistance, and report the number of blinks or beep tones. You must also know the exact model or product name of your computer.
If you have just replaced any internal hardware components (memory modules, hard drive, etc.) and you experience a blink or beep code, the component might not be connected properly. To correct this problem, you should remove and reseat the new components.
Symptom: LEDs glow, fan noise is heard, but display is black or blank
When electrical power is available to the system board, various LEDs glow when the power button is pressed.
| Symptom | Possible Cause |
| When you press the power button: LED lights blink or glow, a fan spinning sound is heard, but the display remains black, and the notebook does not start. | A black screen with no error message usually indicates a problem with the basic functionality of a critical component. There are some actions that you can take before contacting HP to get technical assistance to resolve the error. A hardware component, such as memory module or bootable hard drive or disc, was installed improperly, or is loose because the computer was dropped or jarred. |
If the LED lights glow and a fan noise is heard, but the display remains black and the computer does not start, you can perform one or more of the following actions to resolve this startup issue. If you have not performed the required hard reset, do it now! See the Perform a hard reset section for more information.
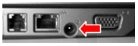
Connect an external monitor
QUICK DISPLAY TEST If there is a problem with the LCD display's back light or a corrupted graphics driver, the display appears blank but the computer might be working. Attach an external monitor to test the display.
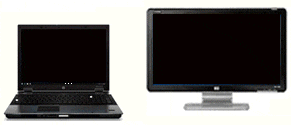
If the image displays on the external monitor, there could be a graphics driver conflict.
To resolve this, turn the computer off. Then, turn on the computer, press the f8 key, and then select Enable low-resolution video.
If the image displays in low resolution on the LCD display, you can download and install the latest update for your specific graphics driver.
If an image does not display on the computer, contact HP for technical assistance.
Physically check the hardware component connections
If the computer tries to start but then stops responding, there could be a loose internal connection. Loose connections can occur when a hardware component, such as a memory module or bootable hard drive or disc, is installed improperly, is not compatible with the computer, or if the computer was dropped or jarred. Perform each of the following actions and then attempt to restart the computer.
If you have recently installed or replaced any components, such as adding more memory or a larger hard drive, do the following:
-
Remove and then reseat any newly replaced components to verify that the connections are seated properly.
-
Remove any new parts and reinstall the original components. If you install the new components one at a time, you can determine if one of the new components is defective.
-
If you installed multiple memory modules, remove the modules and then install one module in a memory slot and try to restart the computer. If computer does not start, move the memory module to other slot and try again. Repeat this action and test each memory module in each memory slot.
Perform Memory and Hard Drive Diagnostic tests
If there is power to the notebook, you might be able to access the EFI or the BIOS to run memory and hard drive diagnostic tests. See one of the following documents for more information.
-
Mid-2009 and later models with EFI
-
Mid-2009 and earlier models
Recover the computer to original condition
If the computer is not responding after you performed all of the other corrective actions in this document, you can restore the computer to its original factory condition if you have the operating system recovery discs, and if the computer can access the DVD drive.
-
Windows 7, Vista, or XP operating system
-
XP operating system
Symptom: Error message displays on a black screen
| Symptom | Possible Cause |
| When you press the power button: LED lights glow, a fan spinning sound is heard, the notebook does not start, and a text message displays on a black screen. | There might be a problem with the instruction being sent from the BIOS to a hardware component (e.g., keyboard failures), or an incompatible device driver. Can usually be resolved by installing updated firmware for a critical component. You can search the HP support web site or the Microsoft Knowledge Base for a specific resolution. |

Actions when specific error messages display
If one of the following error messages is displayed on a black screen, click on the link for more detailed information about resolving the particular error.
Actions when no error messages display
If the displayed error message does not appear in the list, search the following websites for a specific solution:
Symptom: Error message displays on a blue screen
| Symptom | Possible Cause |
| When you press the power button: LED lights glow, a fan spinning sound is heard, a text message displays on a blue screen, and the notebook stops responding. Or, computer might restart or freeze with no message on a blue screen. | There is a conflict when loading drivers and services. Can usually be resolved by installing updated drivers or changing the loading sequence. An error message is displayed but is cleared if the computer attempts to automatically re-start. |
In some cases, the computer might operate properly in Windows but suddenly fail when you start or exit a program. Problems that cause a blue screen error usually display a specific message and have a specific solution. The computer can usually be restarted by turning the power off and then on, but ignoring the error message does not resolve a recurring problem.
If the computer is set to automatically restart when an error is detected, the computer restarts without displaying the error message. In this case, use the instructions below to Disable the Automatic Restart option in Advanced Boot Options, and then write down the specific blue screen error message.
Use a computer with access to the internet to search the following websites for solutions to the specific error message.
Disable the Automatic Restart option in Advanced Boot Options
If no error message is displayed, and the computer cannot start into Windows, do the following to disable the automatic restart feature in the Advanced Boot Option.
-
Turn on the power and press f8 to open the Windows Advanced Boot Option screen.
-
Select Disable automatic restart on system failure to view error messages.
note:For Windows XP, to disable the automatic restart on system failure feature, install XP service pack 2 or later.
Actions when no error messages display
If the displayed error message does not appear in the list, search the following web sites for a specific solution:
Actions to resolve blue screen error messages
If the computer displays a blue screen and stops responding, you can perform one or more of the following actions to resolve the startup issue.
Perform Memory and Hard Drive diagnostic tests
If there is power to the notebook, you might be able to access the EFI or the BIOS to run memory and hard drive diagnostic tests. See one of the following documents for information on performing memory and hard drive diagnostic tests.
-
Mid-2009 and later models with EFI
-
Mid-2009 and earlier models
Use Windows Advanced Boot Options to start computer
If computer does not start into Windows, turn on the power and press the f8 key. On the Windows Advanced Boot Option screen, select one or more of the following options. Select them one at a time and press the enter key to attempt a system restart.
-
Disable automatic restart on system failure to view error messages.
-
Repair Your Computer allows Uninstall recently installed software programs Windows to run diagnostic tests.
-
Last Known Good Configuration (Advanced) to return settings to an earlier point in time.
-
Boot into Safe Mode and then Uninstall recently installed software programs.
When in the computer is running in the Safe mode, click Start, Control Panel, and select the Uninstall a program option. When the computer is operating again, go to program manufacturer's Web site for support information.
Run a Microsoft system restore
-
In Windows Vista or Windows 7
Click Start, type restore in the search field, and select System Restore from the list. Select a windows restore point from a time when the computer operated properly, and then follow the on-screen instructions.
-
In Windows XP
Click Start, All Programs, Accessories, System Tools, System Restore. Select a windows restore point from a time when the computer operated properly, and the follow the on-screen instructions.
Update Windows, the BIOS, and HP device drivers
If you can access the Windows Advanced Boot Options window, and can select Safe Mode with Networking, and have an internet connection, perform the following tasks:
-
Open a web browser (Internet Explorer is the preferred browser for this specific task). Go to the Windows Update: FAQ website for more information about Windows Update.
-
Open a web browser (Internet Explorer is the preferred browser for this specific task). Go to HP Customer Support - Software and Driver Downloads webpage. If a Let's identify your product to get started page displays, select your computer type, type the model name of your computer, and then click Submit. The product support page opens.
From the list of available software and driver categories, click the BIOS category, click the Download button, and then follow the on-screen instructions to download and install the latest BIOS version.
Symptom: Displays Windows logo on screen and hangs
| Symptom | Possible Cause |
| During startup, the Windows logo displays, but then the startup process stops. The keyboard and the mouse do not respond. | There is a conflict when loading services and programs in the Windows environment. In some instances, the computer attempts to shut down and restart, but does not startup fully into Windows. It might be necessary to press and hold the power button for 15 seconds or more to force the computer to shut down. |
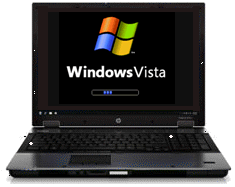
The Windows logo appears on a blank screen or a specific error message is displayed. The computer can usually be restarted by turning the power off and on. With Windows 7 and Windows Vista, you might be prompted to select a Windows Startup Repair option when the power button is pressed again after a startup error.
Disable the Automatic Restart option in Advanced Boot Options
If no error message is displayed, and the computer cannot boot into Windows, do the following to disable the automatic restart feature. Turn on the power and press f8 to open the Windows Advanced Boot Option screen. Select Disable automatic restart on system failure to view error messages.
Actions when specific error messages display
-
Use Windows Advanced Boot Options to start the computer.
If computer does not boot into Windows, turn on the power and press f8. On the Windows Advanced Boot Option screen, select one or more of the following options. Select them one at a time and press the enter key to attempt a system restart.
-
Repair Your Computer allows Windows to run diagnostic tests.
-
Last Known Good Configuration (Advanced) to return settings to an earlier point in time.
-
Select Safe Mode and then run a Microsoft System Restore to an earlier point in time.
-
Select Safe Mode and then Uninstall recently installed software programs.
-
-
Restore the BIOS defaults.
To reset the BIOS configuration to its default condition, turn on the computer and press f10 to enter the BIOS setup, and then press f9 key to reset the BIOS defaults option.
-
Restore the default VGA Low-Resolution graphics settings.
If there is a graphics driver conflict, turn on the computer and press f8 key, then select Enable low-resolution video. This allows you to download and install the latest graphics drivers. Once the correct driver is installed you can select the desired resolution.
-
Run an anti-virus program.
Search for and remove any virus or malware.
-
Test the hard drive.
The HP Hard Drive Self Test can repair most errors. Turn on the computer and press f10 to boot into the BIOS Setup and select Hard Disk Test.
-
Restore the system to a known good configuration using Microsoft System Restore.
Turn on the computer and press f8 and then select Boot into Safe Mode. When in Windows, click Start, type Restore in the search field and select System Restore. Select a restore point when the computer was operating properly.
Actions when no error messages display
Restart the computer. If a specific start up error message is displayed, search the following web sites for a specific solution:
Recover the computer to original condition
If the computer is not responding after you performed all of the other corrective actions in this document, you can restore the computer to its original factory condition if you have the operating system recovery discs, and if the computer can access the DVD drive.
-
Windows 7 or Vista or XP operating system
-
XP operating system
What to do when the computer starts into Windows normally
If the computer started after performing a Hard Reset and connecting the AC power only, you should shut down the computer, insert the battery, and restart the computer using the battery only. You should also test and calibrate the battery for best performance, see Testing and Calibrating the Battery (Windows) or Improving Battery Performance (Windows).
If you performed one or more of the troubleshooting processes and your computer booted normally into the Windows operating system, you should do the following to prevent future problems:
-
Run HP Support Assistant to update HP software and drivers.
-
Run Windows Update to update operating system and software.
-
Run anti-virus program to remove any virus.
How to Modify Startup Programs in Windows Xp
Source: https://support.hp.com/us-en/document/c01443371